

Arashi shibori is a type of Japanese resist dyeing where fabric, usually silk, is wound around a pole or pipe, then bound, then dyed by immersing the fabric wrapped pole in a dye bath. The end result is a beautiful diagonal ripple stripe. A few modern adaptations of arashi shibori include wrapping and dyeing fully made garments, direct application of the dyes and the use of pvc pipe for the wrapping pole. Sheer cotton, rayon, gauze, and other light weight fabrics of plant origin can be successfully used for this form of resist dyeing along with fiber reactive dyes. For intense multicolored shibori, my preference is for direct application, rather than immersion dyeing.
Supplies needed:
- Sodium carbonate pre-soak solution: one cup of sodium carbonate dissolved in one gallon of water.
- Fiber reactive dyes in squeeze bottles, or small cups.
- Cylinder– I often use a large clear food canister, so I can see both sides of the bound fabric. Wine bottles, plastic tubes, PVC pipe, two liter soda bottles, 5 gallon buckets, are all cylinders that can be used successfully.
- Cord, elastic, or sinew for binding.
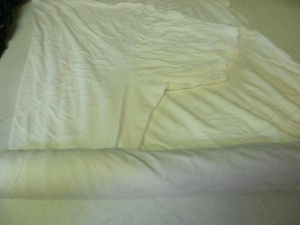
- 1 yard or more of white or pastel light weight rayon or cotton fabric 45 inches wide, or a light weight garment, washed and dried omitting fabric softeners and dryer sheets.
- Masking tape.
- Soak the item to be dyed in a solution of 1 cup of sodium carbonate dissolved into 1 gallon of warm water for about 30 minutes.
- Wearing gloves, wring the fabric or garment out over the pre-soak bucket until just damp. Spinning in a washing machine is recommended.
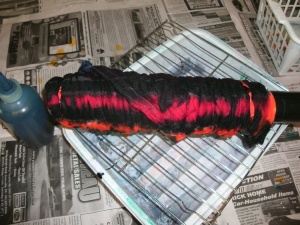
- The cloth is wrapped on a diagonal around a cylinder. Depending on the size of the cylinder, the fabric can folded, or over lap several times. The cloth can be secured with tape at one end and the cylinder turned to wrap.
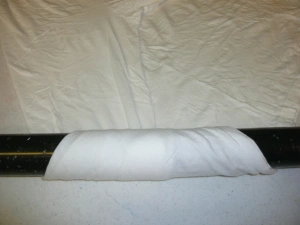
- This is a XXL Tee shirt folded diagonally.
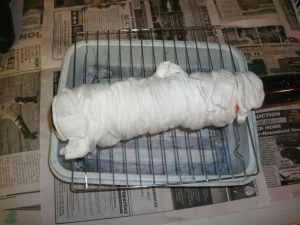
- The cloth is very tightly bound by wrapping thread, or cord or sinew up and down the cylinder. Here the binding cord is a rubber band at one end.
- Usually at this point the bindings are wrapped around the fabric. My Tee shirt is so thick and damp, it will cling to itself with only binding either end with a rubber band to hold the shape of the pleats, once scrunched.
- Next, the cloth is scrunched on the pole. It should be a snug fit. The result is a tightly pleated cloth with a design on a diagonal.
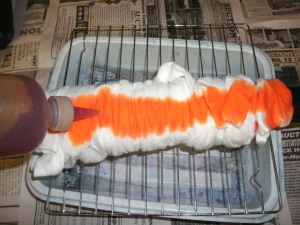
- Dye is applied with squeeze bottles, or sponges, or brushes.
- Batch for 12-24 hours.
- Unband, washing out excess dye in hot soapy water.
- Machine launder.


.

Cotton fabric is 36 inches wide by 108 inches long, dyed in four colors. The above photo is from the middle layers.

The outermost layers have the darkest, least distinctive dye pattern,

while the inner most layers have the tightest and lightest dye patterns.

The two ends compared.
A technique frequently used in shibori is over dyeing with black or other very dark color. This can be accomplished by over dyeing the first dye application 20 minutes into the batching process. Or, more commonly, the entire binding and dyeing process is completed twice. The first time the dyeing is done in pastel or light colors. The second time the dyeing is done in dark colors or black, sometimes going in different direction.

Twice dyed using shibori technique, 36 x 36 linen, 2011, by Ruth Cooper
Another fun variation is reverse shibori, where dark fabric is wound around a cylinder, bound, scrunched, then treated with a discharging agent for about an hour. The fabric is then unbanded and the discharging agent is neutralized. Work in a well ventilated area when discharging, please.
There are many variations to explore with shibori, from how the fabric is folded before wrapping, to how the wrapping is done, to how the binding and scrunching are done, to where the dye is placed. The combinations of variables is endless! My studio was once located next door to a restaurant that received shipments of condiments in tall square 3 gallon pails. Using those square pails as wrapping poles created several unusual shibori dyed fabrics. Who says the pole must be a cylinder??
I hope you found this information useful. If so, please consider making a donation to help keep my site advertisement free.

Pingback: Mostly dyeing… | Diannajessie
I have no experience dyeing with natural indigo, so can not answer your questions regarding the comparison with fiber reactive dyes absorption rate. Almost any project can be achieved using direct application rather than immersion, ie, arashi shibori, batik, tie dye, ombre. If you are having difficulties with over-saturation using immersion methods, direct application might solve that problem.
Ah ok! Thanks for writing back- i used dumbell weights (the plates that you attach to rods) as clamps today with the accordian triangular fold- it looks quite nice though but never tried direct application- will try it tomorrow- im going to be referring to your blog for instructions from time to time !
Hi ! You have a great blog here- im just doing some DIY’s in dyeing these days since i want to (in a few weeks) setup a vat of natural indigo and do some shibori projects- At this moment however im using procion M dyes and doing immersion dyeing- iv had to use very tight G Clamps for resist else the dye penetrates everywhere-
Does the natural indigo dye in a vat penetrate slower into the fabric compared to Procion M dye especially when immersion dying? Just curious to know your experience- ?
Also when (for what kind of projects/designs) do you recommend using direct application as opposed to immersion ?
Thanks 🙂