Yoga Pants, Lorraine Cook, 2014
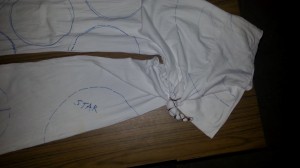
front and back views
It is a great pleasure to introduce a guest blogger to share with us some of her marvelous wearable art. Lorraine Cook lives, works, and plays in Interlachen, Florida in the USA. TieDyedHippy.com is the place to view and purchase her wares. After several years of learning the basics, Lorraine has developed her own personal style of tie dyeing unlike any other. She was gracious enough to photograph her process, documenting the magic to share here at Up and Dyed. Friends, prepare to be inspired!
In her words:
I start with a pair of white cotton yoga pants that have been soaked overnight in soda ash water, spun out in the spin cycle of my washing machine to get all the excess water out, and then hung on a hanger until they have completely air dried.
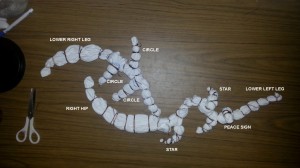
I lay them out flat and draw areas where I want the stars, peace sign, hip and lower right leg designs to be. Then I use a 3 lb coffee container lid to trace the half and full circles on the right leg.
Beginning with the 8-point star at the top of the wearer’s left leg, I fold and tie that, working my way down to the next star, and finally the peace sign.

Moving to the right leg, I fold the leg in half, with the inside and outside seams meeting and clip the edges together in a couple places to keep the fold in place.[editor’s note: Lorraine is using paper binder clips to secure her work. Clothes pins, or any similar clamp will work fine.] Starting with the top half circle I pleat along the drawn line and then band it tight with sinew on the line and then tie 4 sections making the sinew tight. I work my way down the leg doing the other half circles the same way.


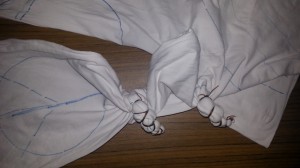
I unfold the bottom section of the right leg, below the half circles, and lay that out flat so I can see the “V” lines that I’ve drawn. I pleat along each line, starting at the top one and working my way down. Keep the line straight when you pleat, pulling it around the corner when you get to it. Band each of those lines loosely, not tight like the circles. When you pull the sinew tight it leaves white lines.
After doing the legs move up to the hip area, laying that out flat and banding it (not tight) as you pleat along the curved lines. Once you’re done with that, lay the pants out, and, beginning at the bottom of one leg, gather the material in sections, wrap with the sinew, pulling it tight, until you’ve got the entire thing banded up.

I use the rainbow for my color selection but you can use whatever colors you like. I like to start with the stars when I begin dyeing. When I’m done with each of those I wrap them up good in plastic wrap using a rubber band to keep them in place.
The plastic wrap keeps each area from touching other areas and transferring one color onto another, which ALWAYS happens to me when I don’t wrap them. After dyeing the 2 stars and peace sign I finish up that leg and move on to the other one, doing the half-circles the same way, wrapping them in plastic as soon as I’m done dyeing each one.
 .
.
Since most of the pants have been tied tight with the sinew it will take MUCH time and patience to add the dye to each section. I use a syringe and literally drip the dye, one drop at a time, onto the cotton. It can take upwards of 3 hours for me to finish dyeing a pair.
Have fun and change up your colors and design placement to create your look!!
I hope you found this information useful. If so, please consider making a donation to help keep my site advertisement free.


